Privacy statement: Your privacy is very important to Us. Our company promises not to disclose your personal information to any external company with out your explicit permission.
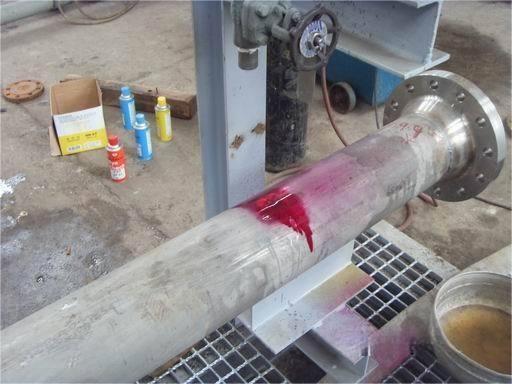
Tint inspection is a method of nondestructive testing. It is a surface inspection method, mainly used to detect surface damage such as cracks that cannot be recognized by the naked eye, such as the detection of stainless steel near surface defects (cracks), pores, porosity, stratification, penetration and fusion defects (also known as PT inspection). It IS SUITABLE FOR INSPECTING COMPACT METAL MATERIALS (WELDS), NON-METALLIC MATERIALS (glass, ceramics, fluorine plastics) and defects (cracks, pores, etc.) on the surface of products.

The basic principle of color detection: the surface of the material is coated with colorant, and the colorant penetrates the damaged part. Rinse the colorant off the surface after a period of time. The surface that has been cleaned is coated with a developer, and the damaged area can be seen clearly because the colorant has penetrated into it. The capillary phenomenon is mainly used to make the permeate into the defect, and the surface permeate is removed by cleaning agent, and the permeate remains in the defect, and the capillary action of imaging agent is used to adsorb the residual permeate in the defect to achieve the purpose of testing the defect.
Pre-clean the workpiece surface
Before applying penetrant inspection surface, should use cleaner clean surface clean, makes checked surface without oil, rust, chip, and other dirt lacquer layer (such as inspection of weld, on the surface of weld and weld edge should not be oxided surface scale, welding slag, spatter, etc), and then, makes the surface of the workpiece tested to fully dry.
Dye penetrant
After evenly spraying the surface of the treated and clean workpiece with osmotic agent, permeate it for 5-15 minutes.
Cleaning and drying
After 5-15 minutes of penetration, and before applying the imaging agent:
(1) Use a cleaning agent to clean the permeant sprayed on the surface of the workpiece, so that the inspected surface should be clean;
(2) Wipe dry with clean gauze or dry naturally at room temperature Note: when removing excess penetrant, over-cleaning or insufficient cleaning should be prevented (ensure that there is no penetrant on the surface of the workpiece).
imaging
After fully shaking the developing agent, spray evenly on the surface of the inspected workpiece (cleaned and dried workpiece) at a distance of 150mm-300mm, spraying Angle is 30° -40 °, and the developing time is not less than 7 minutes.
To observe the
1, the observation of the trace, should be applied after the development agent, until the size of the trace does not change, about 7-15 minutes, the observation of the development should be in the application of the development agent within 7 to 60 minutes.
2, observe the trace, must be in sufficient natural light or white light.
3, the observation shows the trace, can be used by naked eye or 5- 10 times magnifying glass.
4, can not distinguish the true and false defect traces, should be the part of the second test.
Results judgment and recording
1, according to the size of the trace and color to judge the size and severity of the defect.
2. If the ratio of the length and width of the defect display trace is not less than 3, it is called the linear defect trace, and the strip defect will show the linear trace.
3. If the ratio of the length and width of the defect trace is less than 3, it is called circular defect trace. Nearly circular defects such as pores, for example, will show a circular trace.
4, defect display trace, according to the need to record with photography, schematic diagram or peeling agent, etc.
5. Mark the parts where the defects on the inspected surface show traces.
The inspection report includes:
1. Code name, name, material, surface state and quantity of the inspected workpiece;
2, the entrusting unit, according to the technical documents and inspection requirements;
3. Model and category of tinted flaw detection agent;
4, detection sensitivity (indicate the type of test block), flaw detection results;
5. Signature of flaw detection personnel and audit personnel;
6. Application date and report date.
November 11, 2024
Письмо этому поставщику
November 11, 2024
June 23, 2022
June 23, 2022

Privacy statement: Your privacy is very important to Us. Our company promises not to disclose your personal information to any external company with out your explicit permission.

Fill in more information so that we can get in touch with you faster
Privacy statement: Your privacy is very important to Us. Our company promises not to disclose your personal information to any external company with out your explicit permission.